FANCY DRESS OUTFITS
There was no question – the only Dr that David could look like and, to me, the most iconic, is Tom Baker. So I looked on eBay and purchased a long coat for $30 with my fingers firmly crossed that it would fit him. David’s never owned a coat in his life and I doubt he’ll ever wear it again, but I felt it was worth it – you’d pay that to hire an outfit for a night anyway.
I saw a brown curly-hair wig when we were in Spotlight one time and said “Ooooh Dan had asked me to look out for a wig for him to have for a party, this’ll be perfect!” What’s another tall story on top of the pile already mounting? And I’d long since told David I would spend our week away after the party confessing the whole truth and nothing but the truth.
For the hat, he already had one, I just had to leave it late enough before the party to pack it without him missing it, but close enough that I wouldn’t forget it!
And the scarf? Well here was one mistake followed by happiness LOL I sewed together 2 lengths of white material and painted panels of appropriate colours onto it with acrylic paint. But that didn’t work because the paint made the fabric stiff so I told David that I wanted a nice stock of 8-ply wool ‘for craft purposes’ and off we toodled to Spotlight and bought about 10 balls. And I crocheted the scarf I’d always wanted to crochet for him anyway. I did a quick test square in knit and one in crochet to see which would be the fastest because that’s one veeeeeeeeeery long scarf when you have a million other things to do, *and* I couldn’t crochet in the car while he drove me anywhere, which is my usual way. That would have been a definite ‘theme giveaway’!
Tom Baker style Scarf
Additionally, I bought some genuine Bassett’s jelly babies and some brown paper bags so that I could insert the first into the second and put them in the coat pocket for him to find. And there was one small surprise in store for us. We put our car in to get a puncture fixed and went for a walk around the block while it was being done. As we were nearly back to the garage, on the footpath was a small plastic who-knows-what. It was cylindrical, white, black and green with a tiny bit that lifted forward like a dalek’s proboscis. Immediately I realised it would make a perfect end for a sonic screwdriver! David is well accustomed to me picking up tiny things to use in my miniatures creation so he thought nothing of this!
And towards the very end of my makings and doings I made him a TARDIS necklace out of polymer clay. David doesn’t ‘do’ jewellery, not even a watch, but I didn’t think one night with a necklace would do him any harm.
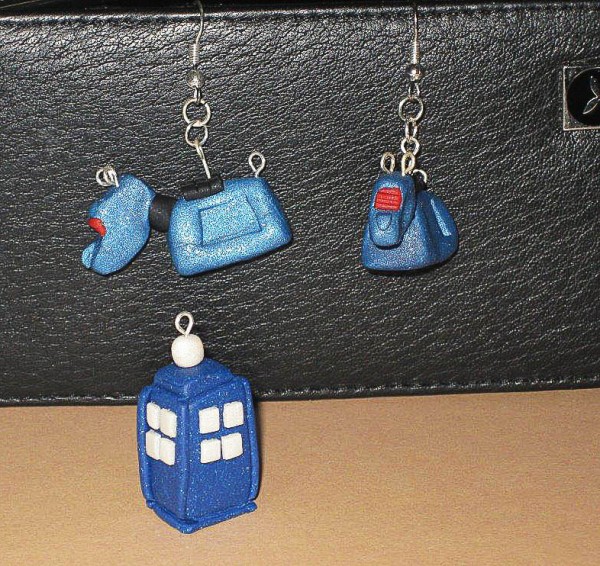
Tardis Necklace & K9 Earrings
My own outfit was very tame. The party wasn’t about me and I was happy to be quietly conforming and leave David to shine, as he always does anyway. A dark blue skirt and blouse with a ‘bib’ made to look like the TARDIS windows, K9 earrings, which I also made out of polymer clay, and a headband that held a battery candle-light in a tiny container that I’d made to look like the light on the top of the TARDIS.

Tardis Headband
Our granddaughters, both perfect for their parts, were Amy Pond and River Song, Georgia having the lovely slim build and long brown hair of Amy Pond, and Emma having the cheeky character and beautiful blonde curls of River Song. And our grandson Andrew smartly sported a bow tie & braces along with a white long-sleeved shirt so that he was Matt Smith. They all looked fantastic! Photos to come when we get to ‘The Big Day’.
Oh and there was one last thing I did, which will surprise nobody. I love to paint my nails in fun designs and of course this would be no exception. Except that once I painted them, the night before the party, I then had to wear cotton gloves to keep them hidden from David until we got to the party venue. So yes indeed, I wore a pair of white cotton gloves to bed, during breakfast and around the house until I went to Nat’s for last minute preparations, and put them on again when I came home for final preparations. I had to banish David from the bathroom while I showered so he wouldn’t catch a glimpse of them then. Hopefully you can tell without me saying that they were daleks.
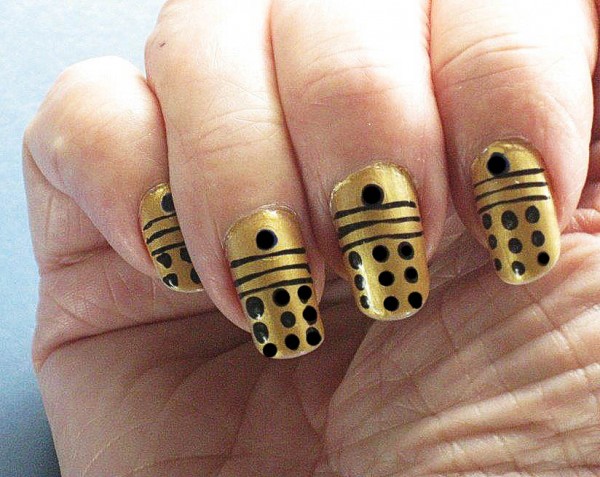
Dalek Nails
CHARACTER MASKS & JOKES
I sourced a number of Dr Who alien masks from the BBC website and printed those out and laminated them to stick to walls/windows or whatever on the day, and also found a few Dr Who jokes on the www and did the same with those – just a few bits to look at and add to the atmosphere.
By this time I was barely managing to conceal everything behind the lounge suite and the next thing finally sealed it. I now had to put the room divider screens across the lounge room doorway and joined up sheets of newspaper with masking tape (I was now on my 6th roll of masking tape!) and hang them across the 2 ‘half-wall windows’ between the lounge and the hallway/entry inside our home. In one way this was unfortunate because I now *really* let myself spread out. But, as you’ll see, I really needed to this time!!!
It was also around this time that Nat and Amie suggested it would be better to open up their full patio area, instead of only using half of it, as we were going to do. I could see the sense in this – we now had 32 positive RSVPs and 18 still to answer and yes, 50 would be a bit of a squeeze in the half area. But what about my streamers? Obviously if we were doubling the party room then the streamers were going to have to be placed further apart on their supporting strings. *Would* it now be too sparse and spoil the effect? I could only wait and see and worry and wonder…
October dragged on and seemed to have lasted at least 9 weeks by this stage. In so many ways I was ready and eager for the party but November just never seemed to arrive.
If you remember, I’d reached the point where I’d finished all of my props. Yes, even, *at last* the night sky streamers, and asked Amie if she wanted me to help with anything she was going to have done towards the day. Amie’s a very busy lady with 2 children and a job and an overly-kind heart, so if I could ‘help out’ (ha ha, towards my own husband’s party ‘help out’ isn’t really the term is it?) then I was happy. Amie was to have done the TARDIS door on their gate into the party area, and a mock TARDIS console, so she asked me if I would do the console. Of course I would! It was still too early to start on the themed food, and I had 3 weeks until David was on holidays from work to do it in. Well, 2 weeks because I needed the last week for the food prep.
TARDIS CONSOLE
Mission… circular table with cardboard tube and lights upright in the centre and various switches and whatsits around it. Oh heck, what have I committed myself to do??? Each job along the way had been a challenge in many ways – mostly thinking up how to create each thing, partly thinking of ways to do things that I could achieve without help, partly doing each thing in stages that could be moved and hidden before David got home from work each evening, partly sourcing materials. I’m a list-keeper by nature, but it’s probably just as well that I never did start a list of material and equipment costs for the party. It might have come as quite a shock by the end.
Nat and I did much measuring of a round glass patio table that they had available for the final product to sit on, but I didn’t bring the table to my house. Perhaps if I had, things would have been a lot more simple but, in for a penny, in for a pound LOL
So how was I going to create a circular/octagonal(ish) console with science-fiction dials and knobs *and* have it so that it could be transported from here to Nat’s place on the day of the party? I found a round lolly (sweets/candies) tin and thought that would make a great scale model to plan the shape of the top panels, and then began cutting up some small pieces of paper to gauge shape and size needed for 8 panels to fill the required circumference around the outer rim of the table, but also towards the centre of the table, allowing for tubes and lights to stand upright in the centre? Amie brought home some gorgeous sturdy cardboard tubes from her work, and Nat had some black-light fluorescent tubes that he was going to put into the tubes, with slits cut to let the light shine. We also planned to have one bright fluorescent light under the table, with a light-blocking ‘skirt’ so that the light would shine upwards through the table to the working panels.
And this is the model below, so now I can explain more to you. I wanted each panel to have a ‘turn down’ at the bottom, which would encircle the table and could be solidly taped once in place to help hold the structure together. I also wanted a small ‘upturn’ at the top of each panel for the same purpose. Additionally, each of the turn-downs needed a couple of cuts to help enable the panel to bend slightly around the circumference of the table. And this is what I ended up with.
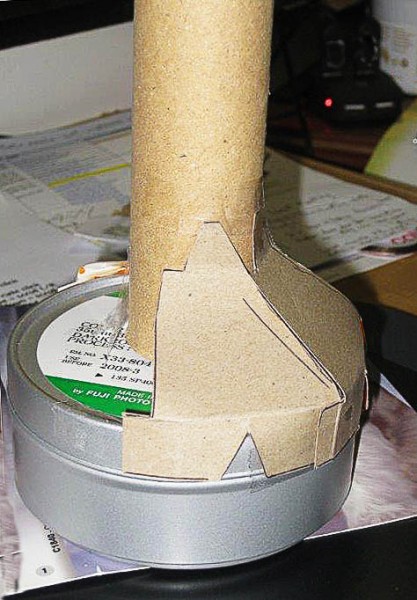
Scale Model
Once I was happy with my design I held the pattern piece up onto the computer screen and plotted it onto an Excel spreadsheet ‘graph’, and then ‘blew it up’ by dragging it larger in Excel. Why Excel? Because you can’t (that I know of) drag a picture larger than an A4 page in Word. But in Excel you can drag it as large as you wish, print it on multiple pages, and then stick the pages together to be the correct size. Ripper!!!
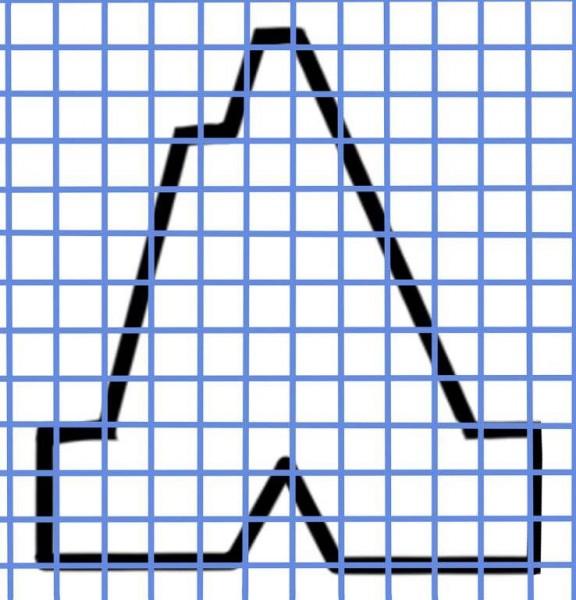
Template
Then I had to transfer this to heavy cardboard. My hands are not very strong so I got Dan involved, and also used his strength to cut some slits and holes in appropriate places in the cardboard sections. Above these I placed various coloured bits so that the light shining from under the table would shine through the holes in the card and make the coloured things glow as if they were powered.
I covered each panel in gold plastic tablecloth fabric – I still had plenty of that! Attaching the bits and bobs was interesting because you can only attach so much weight per item to thin plastic, so for heavier items I had to make a hole in the plastic and glue gun the item to the actual card.
As I’ve already mentioned, David is used to me picking up ‘rubbish’ from along the roadside as we walk, but suddenly I was on hyper-speed, usually picking up 2 or 3 things on every walk. The joke about his party having karaoke was now expanding because he was totally mystified as to why I would want all this rubbish, and we mutually decided that I was creating a rubbish truck and it was for a game of ‘pin the rubbish on the rubbish truck’. We enjoyed many laughs about the possibilities!
Here’s Dan cutting pieces of card for me. That kitchen bench really earned its living between August and November LOL
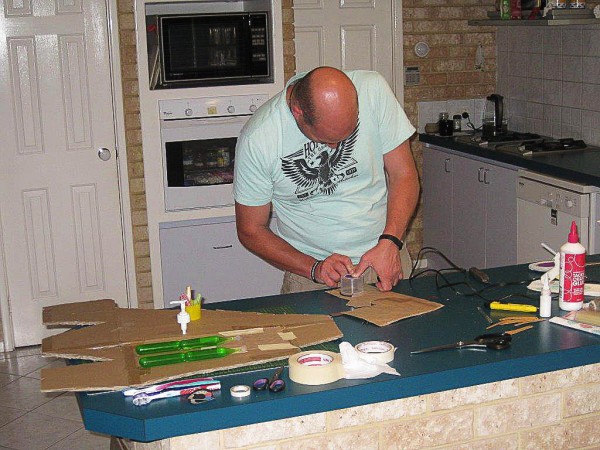
Dan’s Help
Day by day, and piece by piece, the individual sections of the Console took shape. It was really difficult, alone, to know how well they would fit onto a table that was still at the party location, and one panel alone was big and awkward to manipulate. There was *no way* I could position them into some form of place to try them for size, but I did decide that 7 would be enough.
I cut some strips of cardboard of varying widths and painted them black with a view to them being between each panel to define the panels, and also allow some overlap or stretching as the need may be on the day, but then I came up with the idea of laying the panels out into a circle on our bed. This is a queen-sized (some call it prince-sized) bed and I was a little horrified at how large it actually appeared to be.
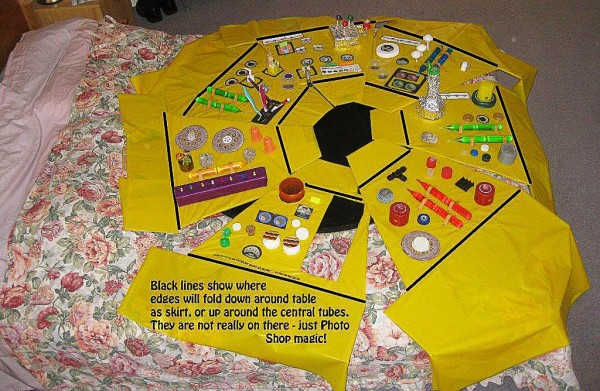
Finished Panels
The green and orange strips are actually plastic-covered icy poles and they looked truly fantastic with light shining through them from behind, I was so excited! You can perhaps make out quite a few lollypops, some toothbrush handles, the original model covered with tin foil and a green lid placed on top, some used circular sanding disks, heaps of various lids. There were several lolly dispensers, and some paper printouts pertaining to photographic terms (one of David’s hobbies) and Dan photographed the dashboard of a bus so that I could put printouts of those on the console too. I wanted it to have humour as well as (hopefully) fascination.
I don’t think I need to post photos of individual sections – do I? I think the Console was my favourite part of the decorations! Ha ha ha!
And it was *still* October!!! I posted a few things about the party preparations on a website I belong to and one of the replies really made me laugh!

Dennis’ Comment
NAT’S DUTIES FOR THE PARTY
TARDIS façade for the entry gate.
Light behind tear in the wall
Fairy lights on roof between the night sky streamers
Lights & tubes in centre of console
Theme music playing on arrival
Show old episodes of Dr Who on overhead TV during the night.
Play music from USB throughout the night
AMIE’S DUTIES FOR THE PARTY
TARDIS façade for the entry gate.
TARDIS birthday cake.
And, shopper extraordinaire that she is, Amie watched out for the things that we wanted to be at a good price and purchased them ahead of time (where that could be done).
FOOD
REAL FOOD
Themed
Fish fingers in tartare sauce coloured yellow to be ‘custard’
Normal
Party pies and sausage rolls with tomato sauce
Spring rolls and other Asian ‘bites’
Ham, chicken or cheese sandwiches – David actually made these on The Day while the rest of us were putting all the secret props into place
Baby quiches – Amie made these and they were delicious
Polony meat rolled up for the children
Curried eggs – my Mum made these
NIBBLES
Themed
Adipose people made from marshmallows with royal icing to ‘glue’ the arms and legs to the head and chocolate facial features
Jelly babies
Normal
Cheese, gherkins & cocktail pickled onions on sticks
Celery sticks w/- cream cheese filling
Salted peanuts and chips
SWEETS (AS IN DESSERT)
Themed
TARDIS chocolates made from moulds – and *there* lies a story!!!
Sonic screwdrivers made with wafer straws half-dipped in chocolate and a blue or green M&M stuck on one end – and there lies another story!
Rumless rum ball ‘moons’
TARDIS birthday cake – as I’ve said, Amie made this
Normal
MarsBar slice
Lemon meringue, apple & apricot pies
I think there are only stories to tell about the chocolates, sonic screwdrivers and adipose people. I will show photos of the cake later because I didn’t get to see it until The Day either. I did this ‘themed item food preparation’ during the final week before David finished work for his holiday, which left, *finally!!!* one week until The Party.
CHOCOLATES STORY
Someone, who shall remain nameless, but you know who you are, told me that you can buy Dr Who themed chocolate moulds in the UK. Well I’m in Australia so there’s problem number one. But I eagerly looked on the web and found…

Chocolates – The Dream
It was the mould, not the chocolates, but my artistic heart and soul drooled copiously at the sight of these! How could I *not* get these for David? The price for the mould was reasonable – the postage was absolutely NOT! Someone told me that the company concerned were noted for being helpful so I emailed them to see if they could reduce their ‘flat rate anywhere outside of the UK’ postage because this was such a small, light item. They replied really promptly, but the answer was a firm no. I forget the figures now, but it was something like £4.99 for the mould and £15 for the postage. It translated as AU$50 or thereabouts anyway. I looked elsewhere on the web and found a Dr Who chocolate/ice cube mould for $40 including the postage. This item was made by the exact same company that I’d found in the UK, had presumably been freighted from the UK to America, and was now going to be freighted to Australia, yet was still cheaper??? Having been smitten with the idea of having this at all though, I ‘bit the bullet’ and ordered it.
The very next day a friend told me that another friend was going to the UK for a holiday, was willing to buy me the first mould and that it would just cost me the $10 because of course there was no freight. Oh timing, how unfortunate you are at times!!!! Without much of a second to think it through, I decided that I would accept that kind offer. Having spent $40, what was another $10; having a guaranteed delivery was a bonus other than something that could get lost in the post on its way from America; having 2 moulds was going to make it easier on ‘making day’; feeling that I’d paid $25 each for them felt better than knowing I’d been stung for $40 on one LOL
This is what arrived from America. Same company or not, it was significantly different, and it made a far better ice cube mould than a chocolate one because each mould was rather large! However, I used it for Feature Chocolates, which I had standing (they were each thick enough to stand in their correct orientation) around the table as items of interest.
Chocolates – the Reality
Amie also purchased some edible gold and silver dusting powder to decorate the chocolates. Her shopping knowledge constantly astounds me; I had never known such things existed! The silver and gold were a lot prettier than they appear here.
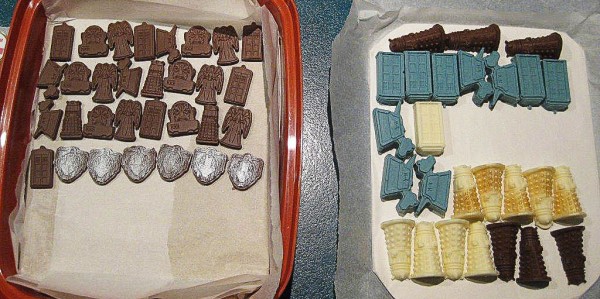
Chocolates – my Version
SONIC SCREWDRIVERS STORY
Imagine this. We went shopping to look for those straw-shaped wafer biscuits that you get around Christmas. But do you think you can buy them in late October? No. We did finally find 2 tins of them on a high pre-Christmas shelf in a large supermarket and headed back to the car. As David was opening the boot one of the shopping bag handles broke and our precious wafer biscuits crashed to the floor. Isn’t it always the way? And there had only been 2 tins for sale, we couldn’t go back and buy more just in case.
But when I came to open the tins they weren’t in toooo bad condition. I soon learned that when I picked up each wafer, if I gave it a bit of a waggle, it would either break, feel wobbly and I knew it *would* break, or it would be sturdy and a suitable candidate to be screwdrivered.
Problem number one was that, if I was half dipping each wafer into chocolate, how would I stand them on end for the chocolate to set? My only cake racks had rows of wires, not squares. And standing them in sand buckets didn’t seem like an option 😉 I thought through other options but the only sane and relatively easy answer that I could come up with was to wrap my cake rack with a roll of copper jewellery wire that I had in my craft cupboard. And this did work in the end after a couple of other small problems to solve.
I put tin foil under the rack to catch any drips of chocolate and then put my first dipped screwdriver, dry-end-down into the rack. It fell straight over – there wasn’t enough distance between the rack and the bench to support the height of the screwdriver. So I lifted the rack and supported it each end on tin foil roll packets. I owned *plenty* of those 😀 This worked and I had about a dozen sticks standing happily upright when I accidentally thumped a small container down on the bench and they all slid on the foil and started to fall sideways and bump into each other! Aaaarrrrgggggggggghhhhhhhhhhh!!! Thinking cap on once more and I hoped that putting paper towel under the rack would be unslippery enough to work. And it did. Thank goodness!!!
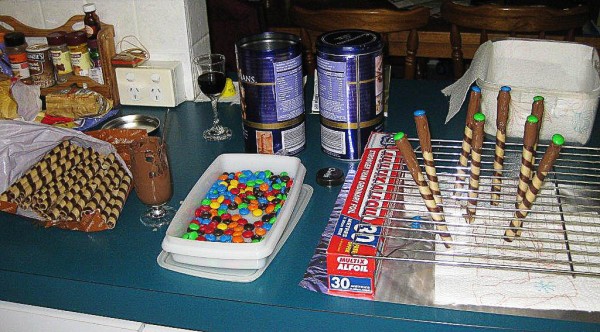
Sonic Screwdrivers
One note. Smarties are too big for this job. I had bought some and found out the hard way of course! I should just have asked Amie which were smaller before I bought them, because she knew already!
ADIPOSE PEOPLE STORY
One large marshmallow and 4 tiny marshmallows for the arms and legs, ‘glued’ together with royal icing, and ‘piped’ chocolate eyes and mouth. Here they are in progress.
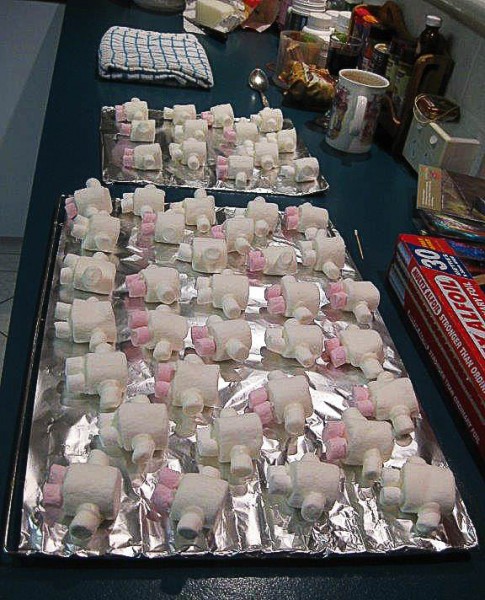
Adipose Beginnings
I thought it too boring to have them all smiling so I did a couple with frowns. And then some of the larger marshmallows were rather squashed and I found, in the end, that each one spoke to me so that I knew what expression they needed. Yes, obviously I was cracking up by this stage ROFL
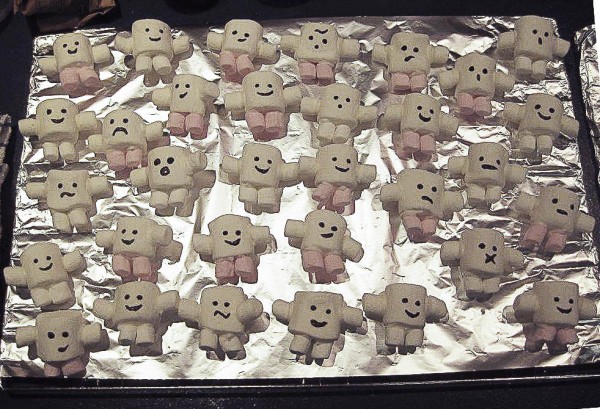
Adipose People with Character
That bottom left one looks like it’s about to jump out of the photo doesn’t it?
All of these foods were gently packed and padded against damage in transit and stored safely in large, air-tight containers away from prying eyes.
And that’s all there is to tell about the early preparation items. I’ll add a page break here before moving on to the 2 set-up days.
Lastly, for this page, I found over the 3 months prep time that I was fascinated by just how many different items of equipment I needed to use for the various creations. And, being a bit of a statistician and list-maker, I wrote them down over a period of days as I remembered all the things I had used. If you care a jot, here is the list, which may not be totally exhaustive! I’ve named it ‘stuff stuff’ because every night for the 3 months, every time David rang me from work (which is usually about 5 or 6 times per night) he’d always say, as is his habit “What are you up to?” Under normal circumstances I would tell him ‘housework’, ‘on the computer’, ‘doing craft’ or whatever. (Believe the first one, believe anything!!! ;)) But of course I couldn’t tell him that any more so my reply would always be a vague “Ohhhhh, stuff stuff!” and we’d both laugh.

‘Stuff Stuff’ Equipment
For the final set up day and the actual party, please click Next page/…
Please feel free to leave a comment in the fields below before leaving this page. Email addresses will not be used in any way, nor displayed for anyone to see.
Thank you Sweetheart!!!!
LOL Well no, I’m ashamed to admit, they didn’t 😉 But thanks so much for your comment dear Sasa
Thank you so much dear Ruth *hugs*
Thanks Tom. Amazed by your knowledge of the topic. Your comment is much appreciated *hugs*
Oohhh that is absolutely AWESOME May!!!!!!!!!
Really nice May! I hope someone moisturised Cassandra.
What an incredible amount of work you did! and everything looks fantastic.
I am soooooo jealous!!! 😀 You even had the Tear!!!!! Amazing. It all looked amazing…the skin head was amazing, too. But the Tear…that was inspired. And yes, I like the new Dr. Who, although not the original series.
It truly was a very happy time, thank you Selina *hugs*
You and your family are amazing, my dear May! Wonderful party and I’m so glad to see you all so happy.
Thank you so much dear Gigi it means such a lot to me that people take the time and effort to comment. And I’m really happy that you’re enjoying my ramblings too LOL *hugs*
OH my Creative Creative Creative
Everything looks absolutely fabulous !!!