David’s 60th Birthday Party – Dr Who Theme
I don’t really know how this all came about. All I can tell you is that David doesn’t like parties and most certainly doesn’t like his birthdays celebrated. However, he completely dotes on our gorgeous Daughter-In-Law, Amie, and she told him he was having a party for his 60th birthday, full-stop, so he said OK.
This is going to be written in a completely different way to all of my holiday/vacation stories so if you’re accustomed to those (available on all the other tabs in this website) then I hope you also find this interesting and entertaining.
The Party was held on 15th November and we have been away for a week’s holiday since then, as well as Christmas and the million other things that fill a craft-loving, photography-crazy, loving wife, mother and grandmother’s head. And the story about our holiday for this website is still to come too. David was on holidays from work until 8th Dec, after which I had a great many jobs to catch up on. So… as I begin to write this report, the date is 12th Dec. (And as I begin to proof-read it, it’s 30th Dec!!!) I apologise for the delay to those who have been asking for it 😀
Anyway… The very first thing I did towards The Party was on 18th August and work proceeded solidly, every chance I got to work in secret, from then until 1st Oct. At which time I, perhaps foolishly, told Amie that I’d finished creating ‘my’ props and was there anything further she wished me to take from her, task-wise, and she did. So work began again on 15th Oct and that lasted until 24th Oct, at which time I took a week off before making the themed foods during David’s last week at work before his holiday time. Of course I wouldn’t be able to work on *anything* that fit the theme while he was around or it would give it all away!
So, obviously, I’ve already neglected to tell you that somewhere along the way I’d decided that we should have the party with a Dr Who theme. David has always been a huge Dr Who fan so there was never any question of what the theme would be! David was aware there *was* a theme, but not what it was. It was the only obvious choice really but, fortunately, David’s brain dwells moment by moment and doesn’t bother with deep thought at all. I wish I could learn the technique!!!!!!! Did I think up the theme? Or did Nathan or Amie suggest it? I truly can’t remember, strange as that may seem. It just developed, bit by bit until it was bigger than Ben Hur (as the saying goes). Nobody that knows me would be very surprised by that at all.
Amie told us that helium balloons were on special at our local Spotlight store – order and pay now, collect on your party date – so off we went to order balloons. By the time I’d finished 3 months of creating props, balloons were the absolute last thing we needed, but we weren’t to know that at the time! We also wandered around Spotlight that day as I wanted to buy the plastic plates, cutlery and plastic tablecloths. I was looking for blue and white. I couldn’t even explain to you now why I wanted white, but the blue was for the TARDIS so it’s apparent that I knew the theme already at that point.
Well we ended up seeing some 1.2m x 30m rolls* of plastic tablecloth for a very reasonable price. There was the perfect colour blue, but no white. But hang on!!!!… there was a gorgeous gold colour… And an idea began to brew in this devious head of mine. (Oh woe is me!!! LOL) Back we went to the plate and serviette section to swap our white plates etc for gold. But they had none. Oh well.
(*m = metre which is approximately 1 yard for those still using non-decimal measurements.)
And then it all began. All the ideas of what I wanted tumbled through my head, some with the assistance of Pinterest, though I was yet to invent the ‘how’ to create them all!
INVITATIONS
Well of course they had to be Dr Who themed and Amie suggested the wording ‘Guess *Who*s turning 60?’ I got busy in PhotoShop and created a TARDIS with a picture of David as an 11 year old looking out of the left door window and a current picture of him looking out of the right one. I did one set for people that he knew were coming and another for secret guests and wrote in them all to please keep the theme a secret and that it was optional fancy dress on the night.
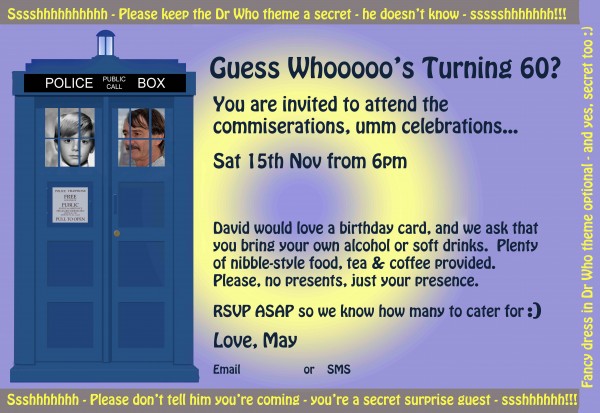
The Invitation
NIGHT SKY
With the blue and gold tablecloth I decided that I would like to create a ‘night sky’ by creating strings with multiple streamers hanging down. They would be mostly blue, but with occasional gold clusters to represent stars. I was excited and thought it would look really pretty! The party was to be held at Nat and Amie’s under their marvellous and huge patio so Nat measured the size of the area capable of having anything hung from the roof…
Roof area to cover – 3.95m x 5.8m and we could accommodate a 1 m streamer drop-length so that the taller guests wouldn’t have their heads in the sky. The plastic tablecloth roll was 1.22m wide so I could cut this across its width and, by the time I’d turned over a little bit at the end to attach the streamer to the hanging string, we should be about right. At about 10 streamers per metre along the hanging strings, just as a rouge guide, 44 streamers by 60 streamers = 2,640. Oh!!! OK!!!!!!!!!!!! Suddenly I had the task ahead of me of cutting across those plastic tablecloth rolls over 2½ thousand times at roughly 1.5 to 2cm widths. But I’m not to be daunted once I’ve thought of a thing so, night after night after night, once David had gone to work, out came my dress-making cutting mat, my scissors and the rolls of plastic. I was *not* looking for a precise job on the widths!
Pretty soon I realised that hanging the streamers over coat hangers (that had to be hidden away each night) was *not* going to work! So I ended up cutting the tops out of 2 large boxes, cutting a new opening along the sides (which was now the top) and taping them together, end to end, in what became known for the next 4 months as ‘the coffin’. David always did wonder why I could lift this huge box unaided but the truth was that it was really light! I just didn’t want the streamers to get screwed up and made ugly so I laid them out flat along the length of the box as I cut them. I also had to spray the contents with anti-static spray a few times because it reached the point where they were leaping up and clinging to my hands every time I tried to put more streamers in there! I made the lid so that it would seal shut each night so that David couldn’t see inside – except for the one day that he walked past it and knocked it on the floor! He was a good boy though and as he yelled “Heeeelp!” he closed his eyes tight while I picked up the few spillages and closed the lid again.
I think the night sky was my favourite part of the decorations!
So here’s ‘the coffin’ on our big coffee table. For now, please ignore the extra cardboard and yellow sheet on top of it, I’ll tell you all about those later.
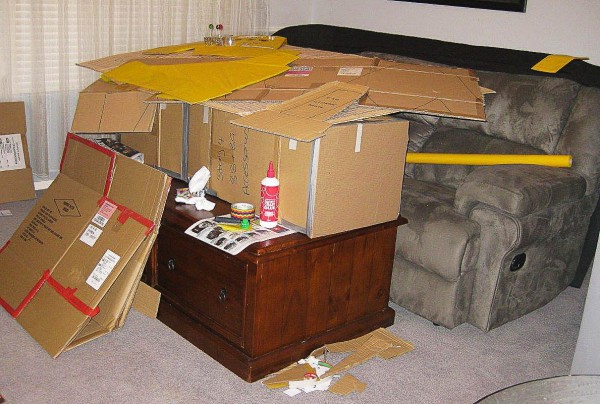
‘The Coffin’
TARDIS DOOR
Next on the planned decorations list was a full-sized TARDIS frontage to go on the outside of the gate that everyone has to walk through to get into Nat and Amie’s house. This was Amie’s idea and she and Nat made this. It was absolutely *perfect*, which would come as no surprise to anyone that knows Amie. I think I’ll leave some photos of finished items until later in the story and just deal with construction at this stage though, so you’ll have to be patient to see this also.
I think the TARDIS door was my favourite part of the decorations!
K9
I looked up pictures of K9 on the web and was surprised to see quite a variety of styles, but I printed one out as inspiration and set about creating him. We’d had Nat and Amie, with girls, around for a pizza meal a short time before and, for the first time in my life and for no (at the time) apparent reason, I’d cut the tops off the boxes to keep the cardboard. So out came 5 pizza box lids and, after some thinking, cutting, taping and yet more taping, the body of K9 was born.
The head was harder to achieve, but I ended up using a tissue box with added, taller cardboard sides and another small box on the top of that for his eyes. It was sturdier to have the neck coming out of the top of the boxes rather than the front, as K9 really is. I don’t think it was an issue! I had a large plastic tub for his neck which I painted black.
Once assembled, I covered the whole thing with white A4 copy paper and then painted it with silver metallic acrylic paint. It took 3 coats but actually looked a lot nicer than it does here.
On his back I cut a hole (praying I’d get the size right!) and inserted a black Chinese-food takeaway container with squares of different coloured kitchen sponge glue-gunned on as the buttons.
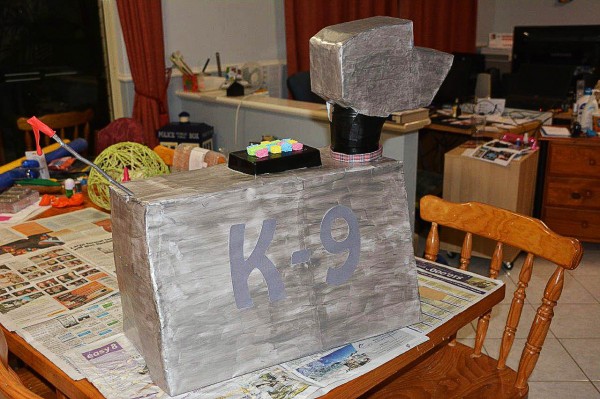
K9 from Behind
The tail was a stick and the red balloon on its end was to help me to notice the stick and not to accidentally break it off! Unfortunately the silver paint looks rather streaky in the photo. It was better than that in real life. I also added a tartan (paper printed from the computer) collar, and the lettering K9. The part of K9 that I was most excited about was his eyes. I made a red cellophane panel that could slide out to the top so that a small torch would fit in the cavity I’d left behind the panel, and light could shine through the eyes to give him life.
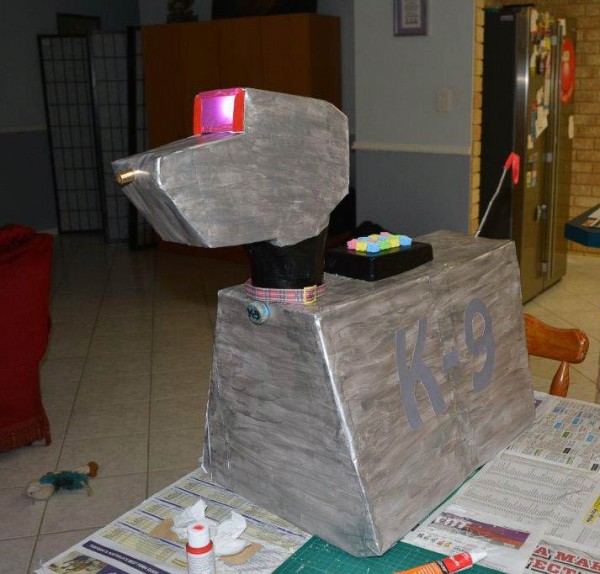
K9 Front
The inside of the body was reinforced with some bent wire coat-hangers to help prevent the sides from collapsing in, and also to give it some strength.
This was hidden in our younger son, Dan’s, bedroom as I worked on it so the poor lad was sleeping with a red-eyed dog staring at him! He’s 32 and made of sturdy stuff so don’t go thinking I was terrorising a pre-teen or anything 😉
I had to virtually remake the insides of K9 three times due to accidentally using inferior masking tape when I first made him, and then unknowingly replacing that with inferior gaffa tape before I bought the highest quality version I could find and reinforced it all for the final time! But he was worth all the bother and I still love him very much!
I think K9 was my favourite part of the decorations!
PLANETS
Now, because David knew he was having a party I was able to con him, I mean ask him, to help with some tasks that would not give the game away and the beginning stages of the planets was one. We blew up balloons and did the ‘glue soaked string’ thing around the balloons, left the glue to set for 24 hours and then popped the balloons so you have hollow string ‘globes’. David knew that these were going to be lights for his party and we would be putting battery-powered candle-lights inside them. No harm done. However, once K9 and the night-sky-streamers were done, and David was off at work, I began covering the string balls with coloured tissue or cellophane paper and turning them into planets. The one I was most pleased with was the Earth. I covered this planet with pale blue tissue paper, Googled a world map outline and then cut the shapes out of dark green metallic paper and stuck it around the globe in the correct places. I also tore cottonwool and placed it around the 2 poles. I was so very happy with it!!! We had also made 2 tiny planets so I covered one in yellow tissue to be our own Moon and let the other one be science fiction to match all the other planets.
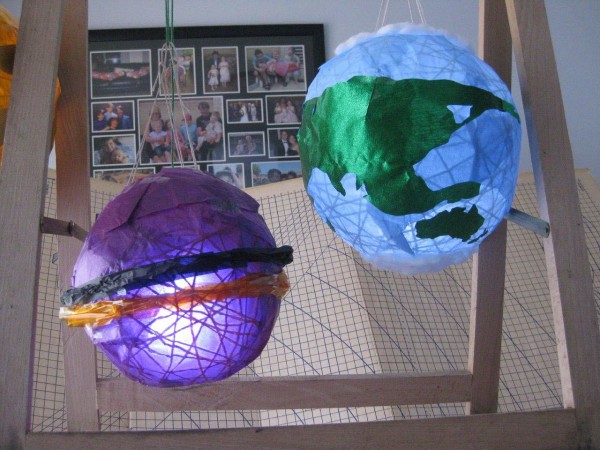
Earth & Friend
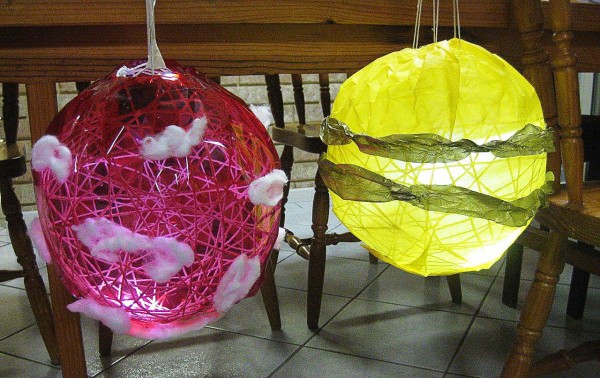
Christmas & Yellow Planets
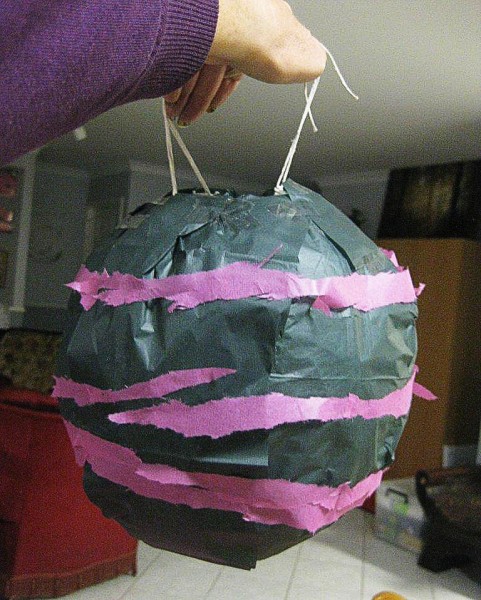
Dead Planet
There was a 6th planet too but there will be more photos of the final setup.
As well as the planets, my 2 granddaughters helped to make some home-made clay stars with glitter on them. David, or Grumpy, as they call him (it’s never been ‘grandad’) helped too because we’d told him the girls were making stars for their Christmas tree at home. This was true – the stars did go for their Christmas tree after the party was done 😉 Though, as he knew full well, I did tell a great many lies during the party preparations, I always made them obviously over the top and we had many a laugh at the ridiculous things I was threatening him with; such as karaoke, which would be amongst his top 5 hated things in the world!
Here are the girls, Georgia and Emma, working studiously on star creation. They really adore crafts and were such a help to me.
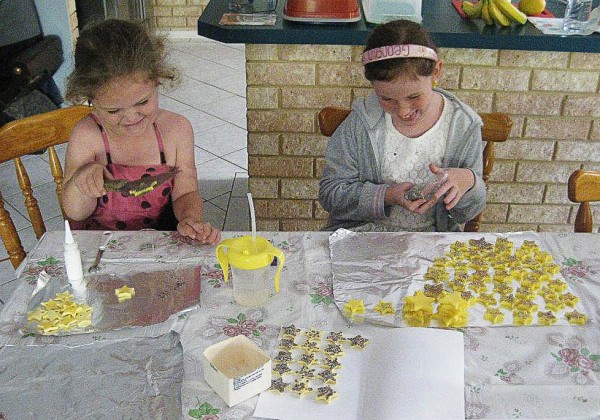
Glittery Stars & Helpers
Meantime, every time David went off to work, I was *still* cutting those streamers to be the night sky!!! By around now I estimated that I’d done around 1,700 so I still had a looooong way to go to get to 2,640!
I think the planets and stars were my favourite part of the decorations!
THE TEAR IN THE UNIVERSE
Around this time I was browsing Pinterest to see what else was essential to a good quality Dr Who party and was reminded of the ‘Tear in the Universe’. Thinking through how to achieve one of those I decided that creating a false ‘bedroom’ wall was the only way to go, and this would take some of the blue plastic tablecloth. It would mean fewer streamers, but would be worth it in the long run! So I measured off a whopping great length of the plastic and put it to one side. I doubt you can sense any disappointment at a few fewer streamers to cut 😉
Unfortunately, photos of this look dreadful but it was in fact rather pretty – particularly once set up and Nat had added light. But we’ll come to that.
I realised that this ‘wall’ was going to need something firm across the top to be able to hang it in Nat’s patio and I had some wonderfully strong lengths of cardboard already in my craft cupboard. *But* the wall was large, and it had to be transportable from my house to Nat’s on the day! So I made a cut in the card around the ½-way mark so the whole thing could be folded in half if necessary. Even so it was never going to fit in my own car and it was now going to be necessary for Nat to come and collect it in his 4-wheel drive. Probably a bonus anyway with the way the quantity and size of the total props were going.
Designing the actual shape of the tear was a push for my skills. I make miniatures and jewellery and other very small things and this was *large*! The tear ended up being almost a metre wide by about 300mm tall. I attached a large rectangular piece of sturdy card horizontally across the centre back of the wall with lots of masking and gaffa tape to hold it, and then cut the tear shape from the centre of that. I then cut through the blue plastic fabric and turned it through to the back, attaching the folded parts with yet more tape. In order that the Wall would still fold, I had to make a cut vertically down the cardboard that was reinforcing the tear. Once it was all attached firmly I realised that I’d made an error. Whilst adding the join in the top card I’d thought to leave a gap wide enough that the thing would actually fold but, with the tear, I hadn’t allowed enough distance between the 2 parts so the entire thing would now only bend slightly, not fold over 🙁 My head was full to bursting point what with one thing and another going on at that stage so I was actually really pleased with all the things I *did* get right and that one little mistake was ‘no biggie’.
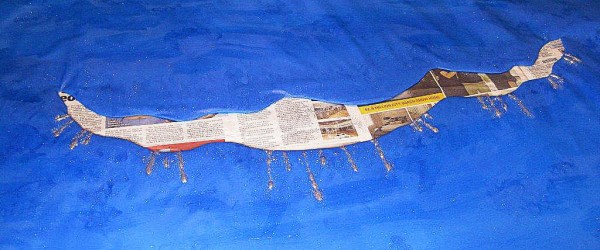
Now the blue plastic sheeting was *very* thin and weak and I knew that firstly, I would have to strengthen it for the journey and secondly, would have to back it to stop the light shining through the fabric and not *just* through the tear as desired. So I backed the whole thing with multiple sheets of newspaper masking-taped into place. And then I didn’t want newsprint making everything it touched dirty so I covered all of that with A4 copy paper, and yet more masking tape. Between K9 and The Tear I was now on my fourth roll of masking tape and second roll of gaffa!
Then I saw a bottle of blue glitter acrylic paint in a craft shop and thought how pretty the Wall would look with that over it. The Wall was already cumbersome enough that the only place it could ‘live’ was hanging over the back of our 3-seater lounge chair and every time I had to move it I had to wait for Dan to be home to help me!
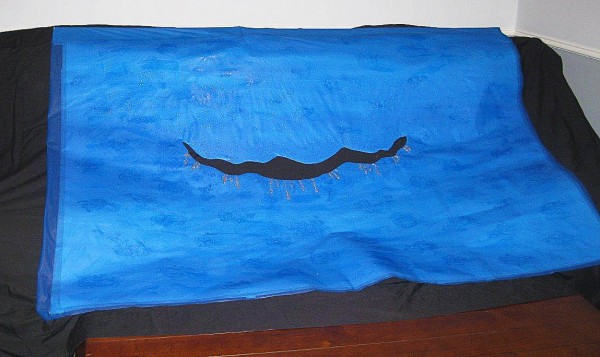
The Tear
To apply the blue glitter paint I started off with a brush but soon realised I’d be there until Christmas, so instead I poured the paint onto my rubber-gloved hand and smeared it on by hand. Once that was done I thought I was finished, but then decided to adorn the tear with plenty of silver glitter to help the rays of light that would emit from it look pretty and spacy, so you can see the drips that I made – and the size and shape of the actual hole too. Unfortunately the blue glitter only looks like a patchiness in the colouring here; it didn’t photograph well at all.
Tear Close-Up
This time I was positive I’d finished until Nat came over and shone a light from behind the wall. Despite all of the layers of paper the light, and not a bright one either, could be seen. So we discussed it and he suggested aluminium foil. Bright boy! And out I went and bought 4 rolls LOL. Again I had to get Dan to help me turn the thing over, with prayers that all the glitter wouldn’t rub off. Plastic isn’t the best thing for holding onto things!
So a layer of foil, attached by yet more masking tape was the next task. And then of course foil is easily torn and the wall had to be transported so I had to do yet another layer of paper to protect it. I stuck with newspaper this time!
I think ‘the tear’ was my favourite part of the decorations!
My secret hiding place for K9, and a slowly growing accumulation of other props, had now moved from Dan’s bedroom to behind the lounge chair with a couple of folding room dividers in front of it to hide it from view, and strict instructions for David not to look in there.
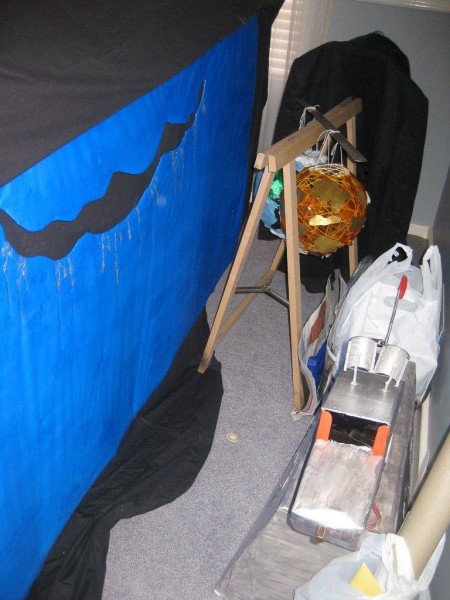
Secret Hiding Spot
CASSANDRA
I just couldn’t believe how smoothly this task was completed. The eyes and mouth were definitely the trickiest part, but the rest was a breeze. We already had some cheap pine ‘trestle legs’ (if that’s the right term for them) so I brought in a set of those and measured out a piece of gold plastic tablecloth the right size to fit pretty much in the middle of those. I had the fabric doubled over, so cut 2 layers at the same time, and sculpted the outer edges to look the way Cassandra should. I added string ties in appropriate places to be able to tie her to the frame. Then for the ‘veins’… Knitting (well, crochet actually ;)) wool seemed like an idea so I cut various lengths and partially unravelled the wool so I had the full thickness at the edges and then little branch veins from the thinner strands. I cut these to various lengths and glued them down!
The eyes and mouth were definitely harder and I had to source something ‘along the lines’ of what I was after on Google and then PhotoShop them to billyo. They still weren’t 100% all I had dreamed of, but I am *not* capable of large art so I put up with what I could do.
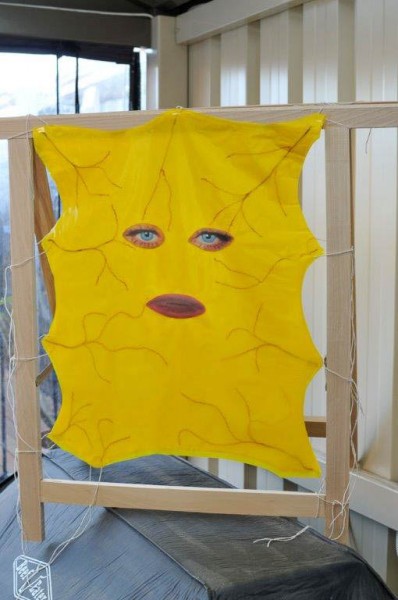
Cassandra
GAMES
You’re lucky, there’s not too much to say here. I just wanted to have some games. Firstly an ‘ice-breaker’ because our friends come from such vastly different backgrounds and many had never met before. I set up a half-page questionnaire with 30 squares and a list of things like ‘I have freckles’, ‘I live in an even-numbered house’, ‘I have known David for more than 30 years’ etc and purchased enough pens that everyone could have a question sheet and a pen. This worked really well and soon (on the day of course!) new friendships and conversations were in full flight. I also made up a ‘spot the differences’ sheet for the 3 children. And then I thought it would be fun to have a trip back to childhood and purchased a few prizes to go inside a ‘pass the parcel’. We had 3 circulating at once so that 3 people could ‘win’ and it wasn’t a long wait for the parcel to come to you. That went well too and everyone said they enjoyed it afterwards.
Georgia had planned some games and a raffle as well! And, even though I bought 3 real prizes she absolutely insisted that 1st prize was going to be a paper aeroplane that she’d made, and didn’t actually fly very well. I laugh my head off every time I think of it. I don’t know why it tickles me so much, it just really does! It was so cute that she wanted to help out though.
MUSIC
At one point the thought of music for the night crossed my mind and I had 2 aims. One was to have the Dr Who theme tune playing while people arrived and I looked up a suitable YouTube URL and gave it to Nat. He has a computer linked to his huge overhead patio TV so that he could show the video on that while we listened to the theme and I was fortunate enough to find one with the theme tunes from the very first episode right through to 2010. I hadn’t realised how much the theme had changed – or how often!
Also, of course, I needed to search out and collect David’s favourite songs, or songs that would take him back, or bring him a smile. I was happily gathering tunes and set them going one night to have a practice run and make sure I was happy with the order of them when I suddenly realised I’d gathered about 5 hours’ listening!!! Culling was a lot harder than the gathering had been 🙁 But eventually I felt that I had a nice selection – everything from the Beach Boys to ‘The Streak’ to ‘The Little Nash Rambler’, right up to some techno tracks that David loves. But there was no way we were having the B52s ‘Rock Lobster’. He knows that the day he plays that is the day he’ll be sorry and no matter how much I love him, that was *not* going to be played in my presence 😉
Oh, and while the normal music played, we had a couple of old episodes of Dr Who showing silently on the overhead TV.
And I was happy.
PHOTO BOOTH
I’d decided that a photo booth would be fun. Also that it would be easier if I included David in the planning of this! I was telling enough lies to power a small village already and this wasn’t ‘theme specific’ so there was no reason why David shouldn’t know, and he enjoyed helping me plan everything for this anyway.
So we ended up buying a length of fancy moulding (actually for skirting boards, but Nathan made it into a picture frame for us). This was a rectangular frame with nothing in the middle and the plan was to attach it to a cross-bar on the roof by light-weight rope so that it could hang vertically, or turn horizontally, according to how many people wished to stand behind it at a time, or how tall or short they were.
Additionally, because I do nothing by halves, I made a big variety of false lips/eyebrows/glasses etc etc which were all reinforced with cardboard and attached to lengths of dowel so that they could be held up in front of people’s faces – either by themselves or by any volunteer. I found most of these on the web, but made alterations and adjustments to them all so that they were just what I wanted.
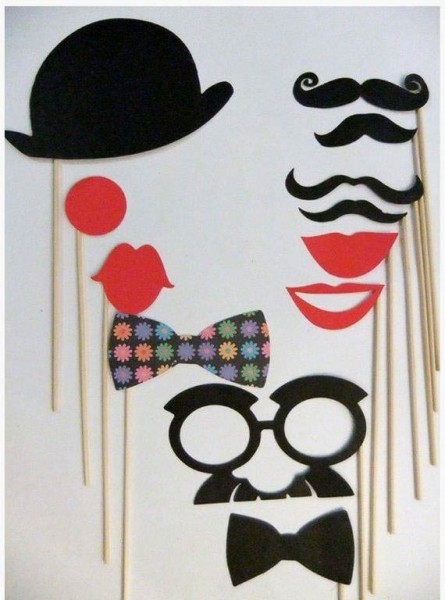
Photo Booth Props
There were more lovely and creative props that Georgia drew as well but I suspect you don’t want to see *everything*. Though I can show more if you wish!
We half-filled two 1kg yogurt tubs with sand so that the sticks could poke into the sand, but be withdrawn easily too.
I also recruited our 9 year old granddaughter, Georgia, to be the official photographer for the night, and the younger 2 to be wardrobe master and mistress, with the idea that they would help people choose props. All were told that they didn’t *have* to do these duties if they didn’t want to – we wanted them to enjoy the party too! But I made them some cute little official badges just in case they did want to. And they pretty much did 😀
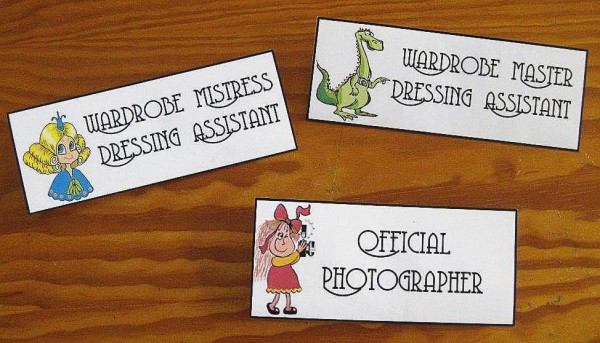
Children’s Badges
Plenty more goodies to come on the next page 😀
Please feel free to leave a comment in the fields below before leaving this page. Email addresses will not be used in any way, nor displayed for anyone to see.
I do that exact typo regularly! But I edited your comment so nobody will know 😉 And thank *you* for taking the time to read and comment *mwah*!
Thank you so much Tracey that’s so kind typically of you *hugs*
Oops! That was supposed to say “Happy 60th TO David, not “the”! *blushes*
Thanks for posting your wonderful stories! *glomps*
What a wonderful idea! *happy tears* To think that the whole family got involved, too! *aww* A belated Happy 60th to David, as well as 40 wonderful years, as Mr and Mrs! :*) Bless you both!
Wow – where can I begin with this effort you have put into your epistle, May. I know you don’t do anything by half, and you certainly have excelled in what you have done on this occasion. I will start reading it today, but expect to be finished by Christmas.
Love, Fiona
Ha ha, so sorry Pat xox
You didn’t send my invite I am shattered! (lol) 🙂
Thank you Elizabeth, you’re always so encouraging and kind! I really appreciate your words *huggles*
What an amazing imagination you have May, not only that, you are able to put your fantastic ideas into practice. Thank you so much for sharing xxx
I just wish I have an overactive desire to do housework as well 😉 I’m so pleased you enjoyed reading dear Mel and thank you so much for taking the time to read and comment.
You seem to have so much energy which I suppose naturally follows from your overactive imagination. I have so enjoyed the first episode and have to tear myself away to go to work. Well done May.
The pleasure’s all mine! I love all your stories here, and this one in particular.
How lovely to ‘see you’ Stefan, thank you so much for taking the time to come and read, and comment. I’m so pleased to have warmed your heart *hugs*
Wow, what an exciting and heartwarming story! I’m almost speechless. Lucky Dave! And lucky both of you and your whole family.
Thank you so much for letting me share your coffee time with you Gigi 😀
YaY I am enjoying your story May as I have my morning coffee
What a lucky David, on to read more 😀